Compute layer
Launch Amazon EC2 instances
- Open AWS Console from the EventEngine page and navigate to EC2 Console and click “Launch Instance”
- Scroll down and select “Amazon Linux 2 LTS with SQL Server 2017 Standard”
- Select r5d.xlarge and click “Next: Configure Instance Details”
- For “Network” select VPC MSSQL-WS-VPC and Subnet: Site-1.
- For “Auto-Assign Public IP”, select Enable.
This option will request a Public IP from Amazon so that your instance will be reachable from the internet. Please note that in production most of the time you don't assign a public IP address to your SQL instance and make them accessible from the internet. The recommended approach is to setup Remote Desktop Gateway environment as jump box for internet access and then access SQL environment using private IPs. For this lab, we are assigning Public IP to access the SQL environment from our local computers.
- IAM role: TeamRoleInstanceProfile
- Network interface:
-
Primary IP : 10.0.1.11
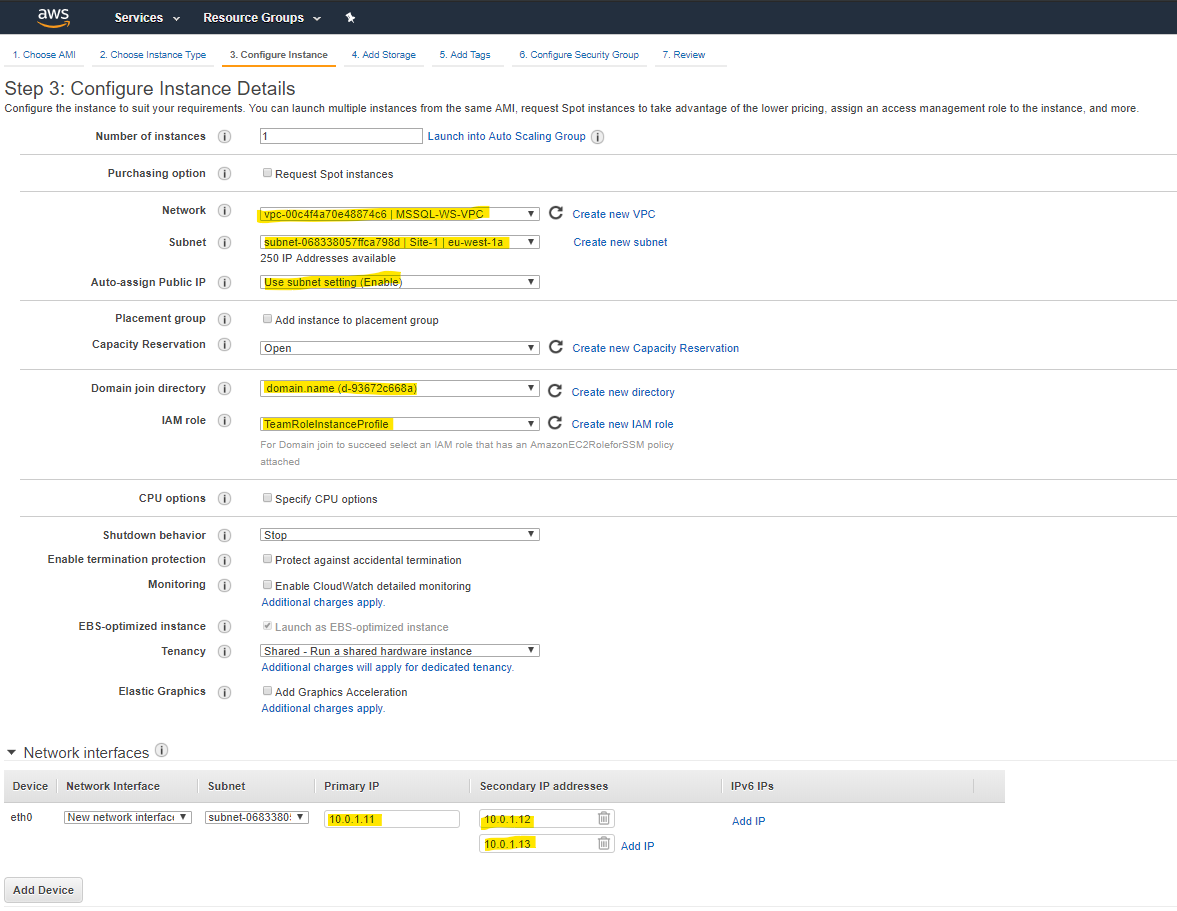
-
Open “Advanced Details” and insert the following script as bootstap This script will handle the storage layer, the temp db on the NVMe local drive, and will also take care in case of shutdown (via startup script)
#!/bin/bash

#Define node IP addresses
NODE1="10.0.1.11"
NODE2="10.0.2.11"

#Preparing directories
systemctl stop mssql-server
mkdir -p /mssql/tempdb
mv -f /var/opt/mssql/data/* /mssql/tempdb

# Create pool and virtual disk for DB files using parity with EBS, ReFS 64K, D: Drive
cat > /opt/mssql/prepare_storage.sh <<EOF
LSBLK_RESULT=\$(lsblk | awk -F" " '{print \$1}')
VOLNAMES=""
LOCALVOL=""
for p in \$LSBLK_RESULT;
do
    if [[ \$p != "xvda" && \$p == "xvd"* ]]; then
       VOLNAMES="\${VOLNAMES}  /dev/\${p}";
    elif [[ \$p == "nvme"* ]]; then
       LOCALVOL="\${LOCALVOL}  /dev/\${p}";
    fi;
done
if [[ \$(ls /dev/md0) != "/dev/md0" ]];
then
  mdadm --create --verbose /dev/md0 --level=0 --name=Data_RAID --raid-devices=4 \$VOLNAMES
  sleep 5
  cat /proc/mdstat
  mdadm --detail /dev/md0
  mkfs.xfs -L Data_RAID /dev/md0
  mdadm --detail --scan | sudo tee -a /etc/mdadm.conf
  dracut -H -f /boot/initramfs-\$(uname -r).img \$(uname -r)
  echo "/dev/md0   /opt/mssql/data  xfs   defaults  0   0 " >> /etc/fstab
  mount -a
  mv -f /mssql/tempdb/* /var/opt/mssql/data/
fi

# Script creating volume for tempdb from instance storage
NUM_LOCAL_VOLS=\$(echo $LOCALVOL | awk '{print NF}')
if [[ \$NUM_LOCAL_VOLS > 1 ]]; then
   mdadm --create --verbose /dev/md1 --level=0 --name=TempDB_RAID --raid-devices=\$NUM_LOCAL_VOLS \$LOCALVOL
   sleep 5
   cat /proc/mdstat
   mdadm --detail /dev/md1
   mkfs.xfs -L TempDB_RAID /dev/md1
   mount LABEL=TempDB_RAID /mssql/tempdb
else
  mkfs.xfs -L TempDB_RAID \$LOCALVOL
  mount LABEL=TempDB_RAID /mssql/tempdb
fi
chown mssql:mssql /mssql/tempdb/
EOF
chmod +x /opt/mssql/prepare_storage.sh
/opt/mssql/prepare_storage.sh
#cronline="@reboot /opt/mssql/prepare_storage.sh"
#(crontab -u root -l; echo "$cronline" ) | crontab -u root -

#script to change tempdb location
cat > /opt/mssql/move_tempdb.sql <<EOF
USE master;
GO
ALTER DATABASE tempdb
MODIFY FILE (NAME = tempdev, FILENAME = '/mssql/tempdb/tempdb.mdf');
GO
ALTER DATABASE tempdb
MODIFY FILE (NAME = templog, FILENAME = '/mssql/tempdb/templog.ldf');
GO
EOF
chmod +x /opt/mssql/move_tempdb.sql

# Create a startup script to handle NVMe refresh on start/stop instance

# Create a scheduled task on startup to execute script if required (if E: is lost)

#Initial server configurations
yum install -y pacemaker pcs fence-agents-all resource-agents

cat > /opt/mssql/corosync.conf <<EOF
totem {
  version: 2
  cluster_name: mssqlcluster
  transport: udpu
  interface {
    ringnumber: 0
    bindnetaddr: $NODE1
    broadcast: no
    mcastport: 5405
  }
}

quorum {
  provider: corosync_votequorum
  two_node: 1
}

nodelist {
  node {
    ring0_addr: $NODE1
    name: primary
    nodeid: 1
  }
  node {
    ring0_addr: $NODE2
    name: secondary
    nodeid: 2
  }
}

logging {
  to_logfile: yes
  logfile: /var/log/corosync/corosync.log
  to_syslog: yes
  timestamp: on
EOF

cat > /opt/mssql/configure_ha.sh <<EOF
CURRENT_NODE=\$(hostname -i)
if [[ \$CURRENT_NODE == *${NODE1}* ]]; then
    #Node1
	sudo corosync-keygen
	sudo aws s3 cp /etc/corosync/authkey s3://ss-experiments/authkey
	echo "sudo pcs cluster auth $NODE1 $NODE2 -u hacluster" > /opt/mssql/create_pcm_cluster.sh
    echo "sudo pcs cluster setup --name mssqlcluster $NODE1 $NODE2 --start --all --enable"  >> /opt/mssql/create_pcm_cluster.sh
	chmod +x /opt/mssql/create_pcm_cluster.sh
else
    #Node2
	while [[ \$(sudo aws s3 ls s3://ss-experiments/authkey) == "" ]];
	do
	    echo "Waiting for node1 to generate authkey...";
		sleep 5;
	done
	sudo aws s3 cp s3://ss-experiments/authkey /etc/corosync/authkey
fi

sudo systemctl enable pcsd
sudo systemctl start pcsd
sudo systemctl status pcsd

cp /opt/mssql/corosync.conf /etc/corosync/corosync.conf
mkdir -p /var/log/corosync/

sudo systemctl start pacemaker

sudo yum install -y mssql-server-ha mssql-server-agent
sudo /opt/mssql/bin/mssql-conf set hadr.hadrenabled 1
sudo systemctl restart mssql-server
sudo pcs cluster destroy
EOF
chmod +x /opt/mssql/configure_ha.sh
- Click “Next: Add Storage” : And add 4 EBS 500GB (2TB) GP2 for the data files
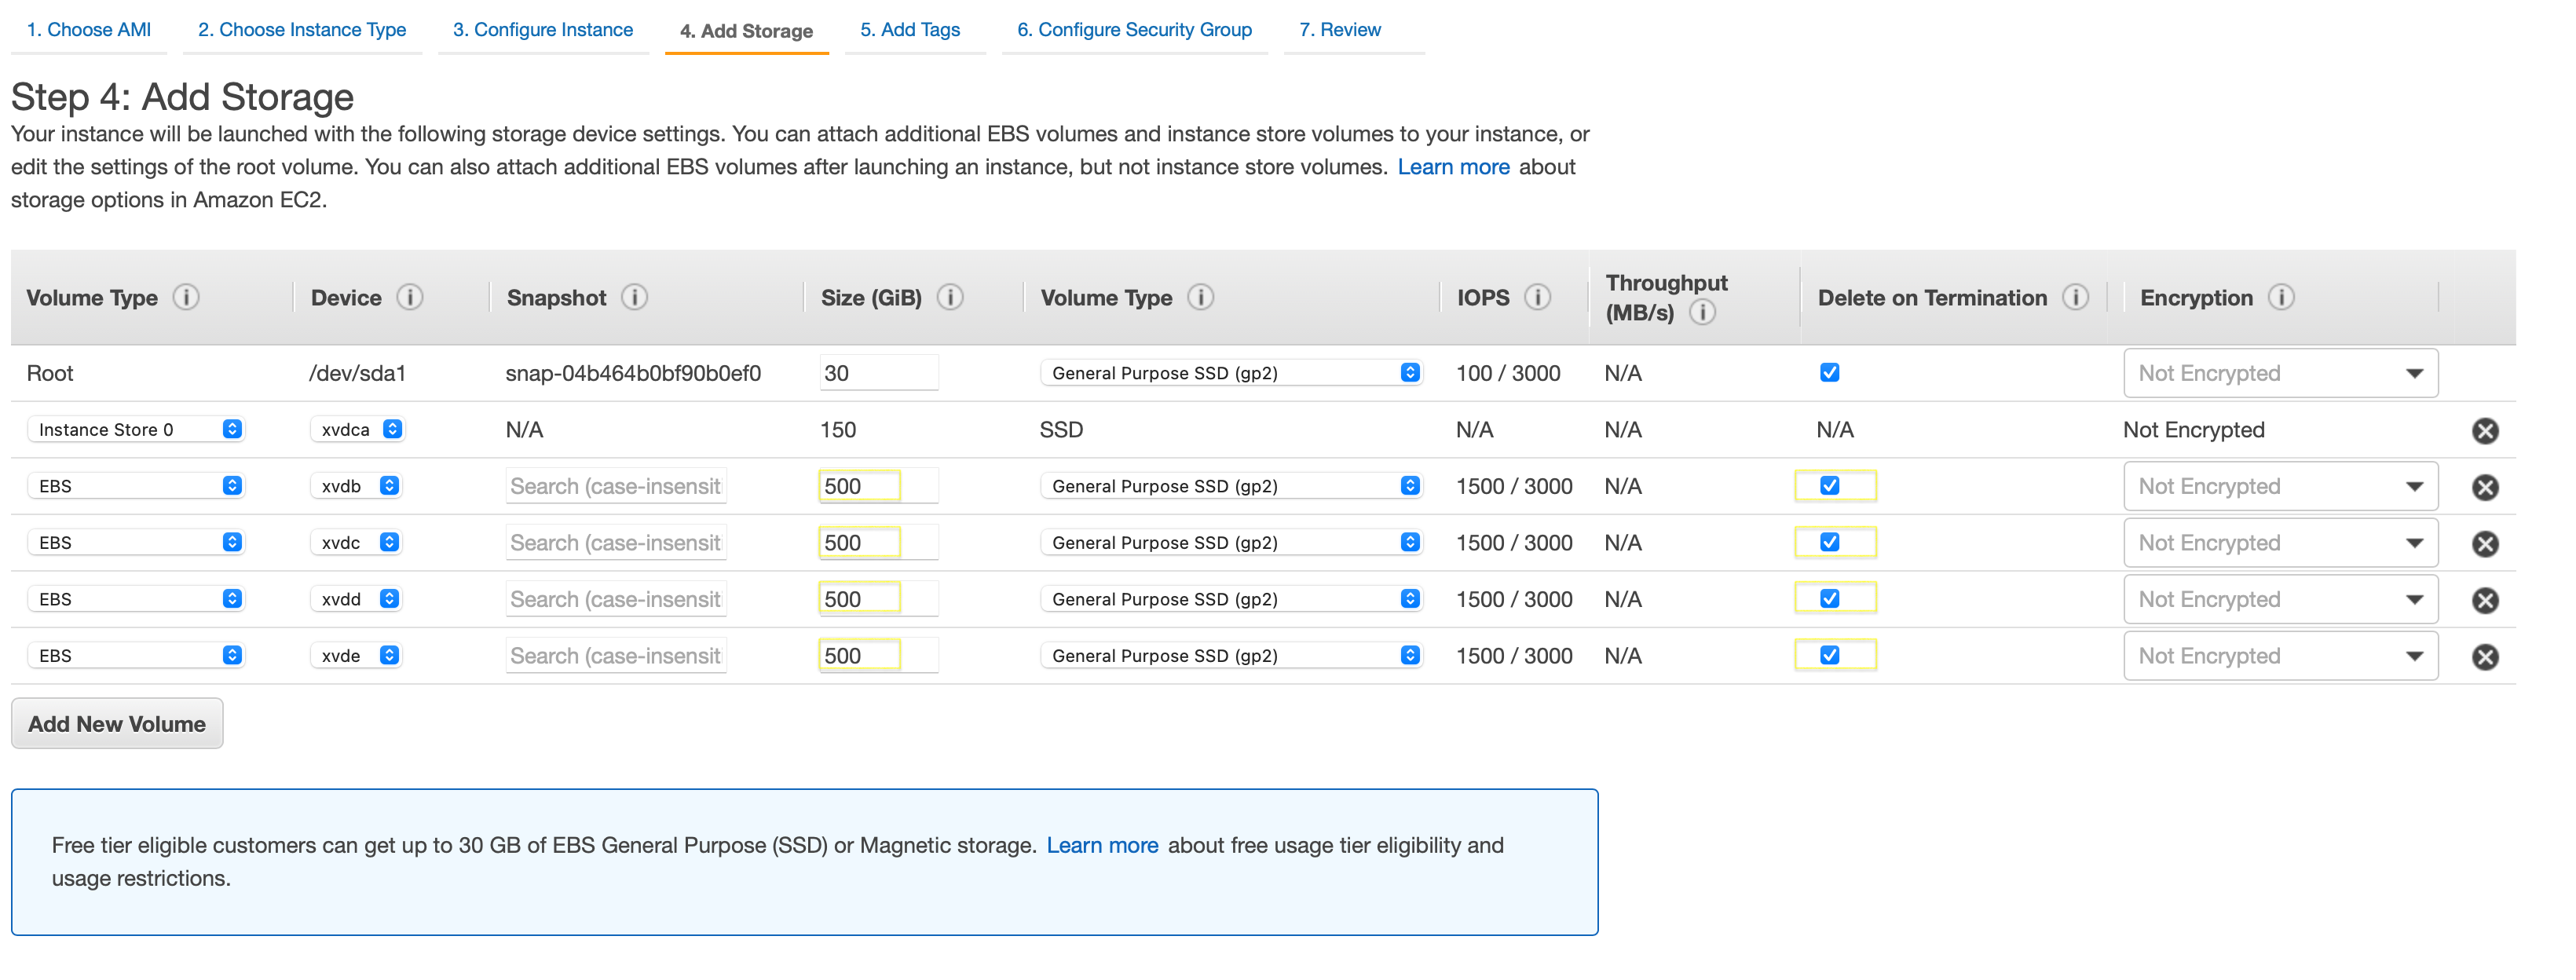
-
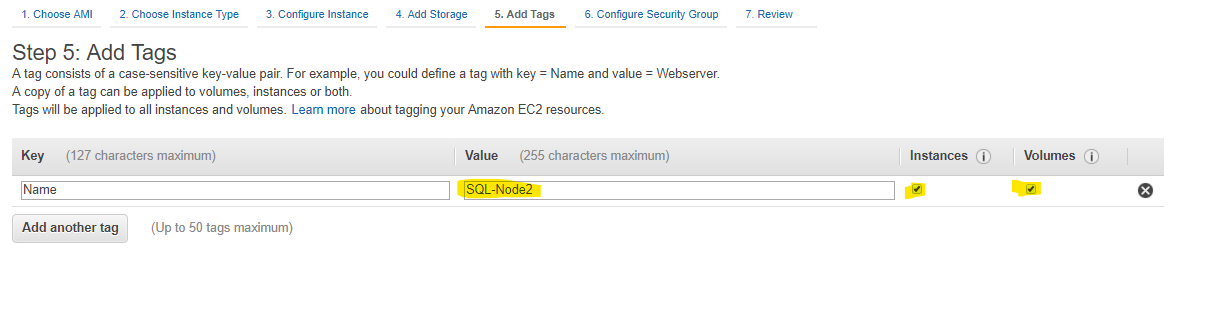
Click “Next Add Tags”: Add “Name”: SQL-Linux-Node1
-
Click “Next Configure Security Groups”
-
Select module-mysql-workshop-vpcStack-1N9ODMBJ5M930-SecurityGroup-1WJCZ85L3NS0U
-
Click Launch Instance
-
You will be prompted to select a key pair for authentication. Create new one! and download it and click “Launch Instances”
-
Go back to EC2 console and click on Launch more like this:
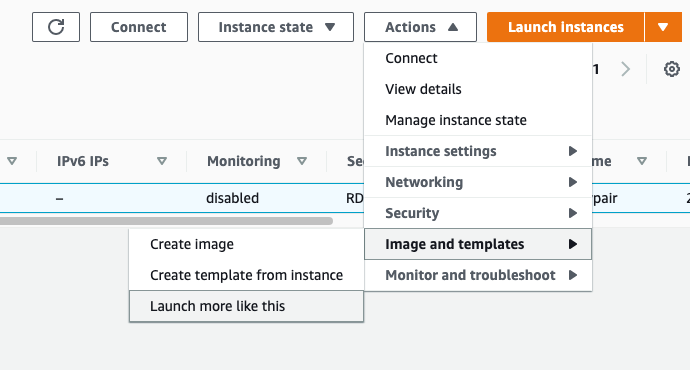
-
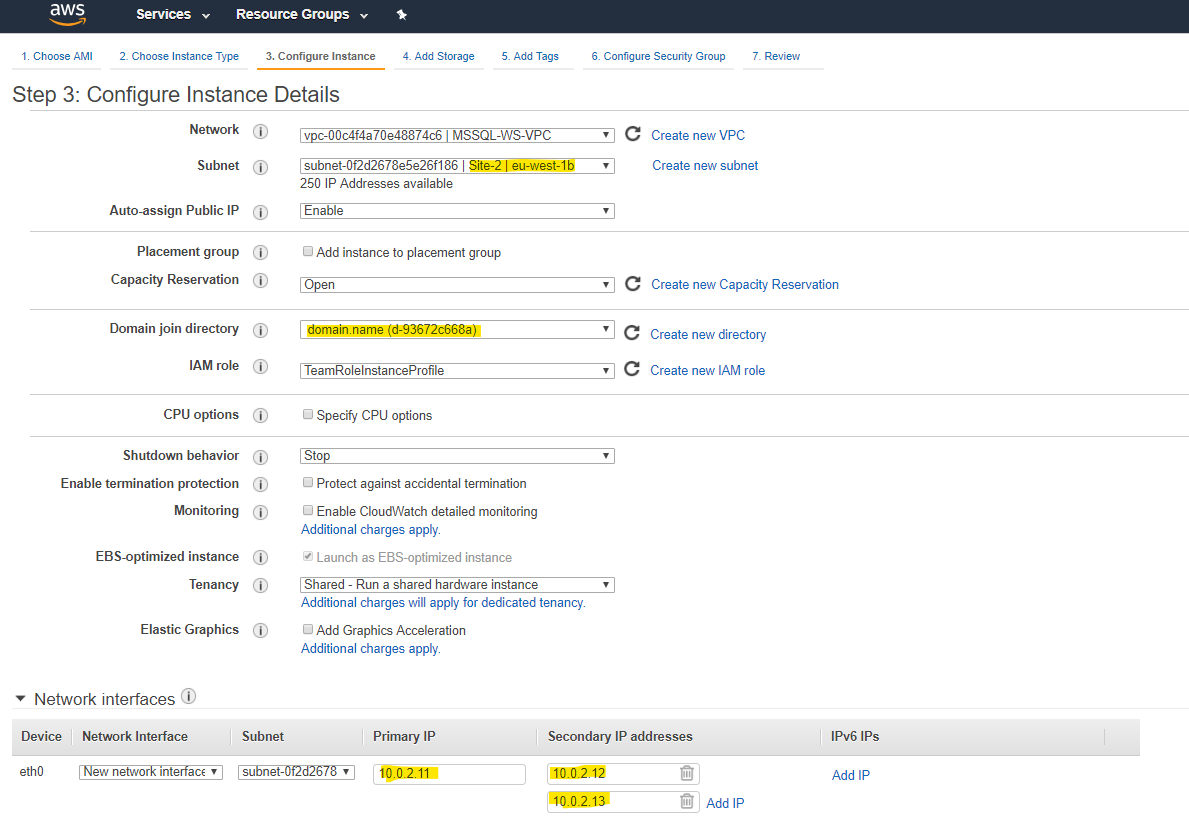
Launch the second instance with the same setting, place it on Site2 with the IP 10.0.2.x
-
In the launch wizard change only the following:
- Network interface: Change the IP to the second subnet
- Add Tags tab: change to Node2.
- Click “Next: Add Storage” : And add 4 EBS 500GB (2TB) GP2 for the data files
- Click “Next: Add Tags” : And change the tag name
Click “Review and Launch”
Once the “Status Checks” shows “2/2 checks passed” your instance will be ready to connect.
If you are using the account from EventEngine, go to security group wizard, and edit the 1.1.1.1 to your local ip 
Congratulation!
You have launched two new Amazon Linux 2 EC2 instances with a pre-installed SQL Server 2017 Standard instance