Compute layer
Launch Amazon EC2 instances
- Open AWS Console from the EventEngine page and navigate to EC2 Console and click “Launch Instance”
- Scroll down and select “Microsoft Windows Server 2019 with SQL Server 2017 Standard”
- Select c5ad.xlarge and click “Next: Configure Instance Details”
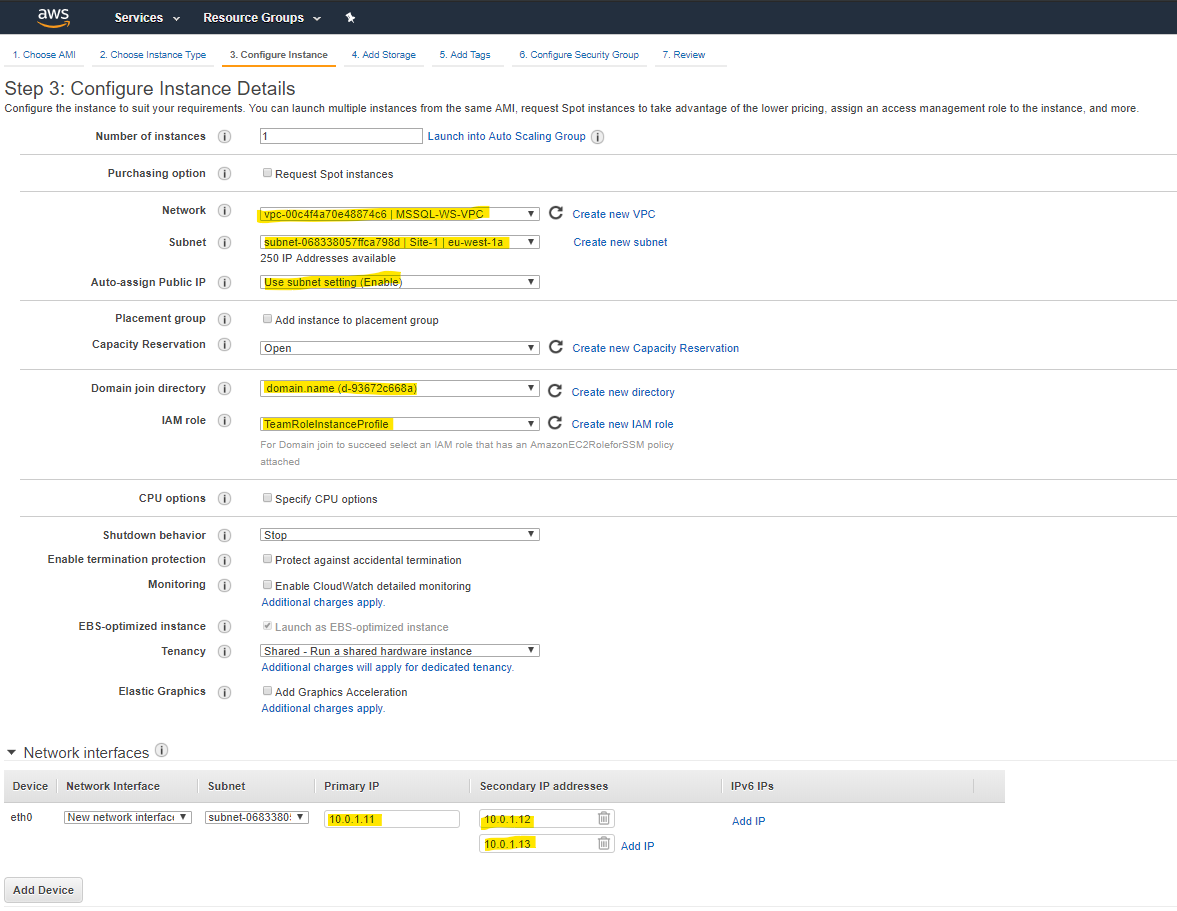
- For “Network” select VPC MSSQL-WS-VPC and Subnet: Site-1.
- For “Auto-Assign Public IP”, select Enable.
This option will request a Public IP from Amazon so that your instance will be reachable from the internet. Please note that in production most of the time you don’t assign a public IP address to your SQL instance and make them accessible from the internet. The recommended approach is to set up Remote Desktop Gateway environment as jump box for internet access and then access SQL environment using private IPs. For this lab, we are assigning Public IP to access the SQL environment from our local computers by using RDP
- Domain join directory: choose the directory “domain.name”
- IAM role: AllowEC2FC
- Network interface:
- Primary IP : 10.0.1.11
- Two secondary IP Addresses : 10.0.1.12 and 10.0.1.13
Here is a screenshot:
- Open “Advanced Details” and insert the following script as bootstrap This script will handle the storage layer, the temp db on the NVMe local drive, and will also take care in case of shutdown (via startup script)
<powershell>
# Create pool and virtual disk for DB files using parity with EBS, ReFS 64K, D: Drive
$EBS = Get-PhysicalDisk | ? { $_.CanPool -eq $True -and $_.FriendlyName -eq "NVMe Amazon Elastic B" -and $_.Size -ne 150000000000}
New-StoragePool –FriendlyName DBPool –StorageSubsystemFriendlyName "Windows Storage*" –PhysicalDisks $EBS
New-VirtualDisk -StoragePoolFriendlyName DBPool -FriendlyName DBDisk -ResiliencySettingName mirror -ProvisioningType Fixed -UseMaximumSize
Get-VirtualDisk –FriendlyName DBDisk | Get-Disk | Initialize-Disk –Passthru | New-Partition –DriveLetter D –UseMaximumSize | Format-Volume -FileSystem ReFS -AllocationUnitSize 65536 -NewFileSystemLabel DBfiles -Confirm:$false

# Create pool and virtual disk for TempDB using the local NVMe, ReFS 64K, E: Drive
$NVMe = Get-PhysicalDisk | ? { $_.CanPool -eq $True -and $_.FriendlyName -eq "NVMe Amazon EC2 NVMe"}
New-StoragePool –FriendlyName TempDBPool –StorageSubsystemFriendlyName "Windows Storage*" –PhysicalDisks $NVMe
New-VirtualDisk -StoragePoolFriendlyName TempDBPool -FriendlyName TempDBDisk -ResiliencySettingName simple -ProvisioningType Fixed -UseMaximumSize
Get-VirtualDisk –FriendlyName TempDBDisk | Get-Disk | Initialize-Disk –Passthru | New-Partition –DriveLetter E –UseMaximumSize | Format-Volume -FileSystem ReFS -AllocationUnitSize 65536 -NewFileSystemLabel TempDBfiles -Confirm:$false

# Create a startup script to handle NVMe refresh on start/stop instance
$bootfix = {
    if (!(Get-Volume -DriveLetter E)) {
        #Create pool and virtual disk for TempDB using mirroring with NVMe
        $NVMe = Get-PhysicalDisk | ? { $_.CanPool -eq $True -and $_.FriendlyName -eq "NVMe Amazon EC2 NVMe"}
        New-StoragePool –FriendlyName TempDBPool –StorageSubsystemFriendlyName "Windows Storage*" –PhysicalDisks $NVMe
        New-VirtualDisk -StoragePoolFriendlyName TempDBPool -FriendlyName TempDBDisk -ResiliencySettingName simple -ProvisioningType Fixed -UseMaximumSize
        Get-VirtualDisk –FriendlyName TempDBDisk | Get-Disk | Initialize-Disk –Passthru | New-Partition –DriveLetter E –UseMaximumSize | Format-Volume -FileSystem ReFS -AllocationUnitSize 65536 -NewFileSystemLabel TempDBfiles -Confirm:$false

        #grant Everyone full access to the new drive
        $item = gi -literalpath "E:\"
        $acl = $item.GetAccessControl()
        $permission="Everyone","FullControl","Allow"
        $rule = New-Object System.Security.AccessControl.FileSystemAccessRule $permission
        $acl.SetAccessRule($rule)
        $item.SetAccessControl($acl)

        #Restart SQL so it can create tempdb on new drive
        Stop-Service SQLSERVERAGENT
        Stop-Service MSSQLSERVER
        Start-Service SQLSERVERAGENT
        Start-Service MSSQLSERVER
        }
}

New-Item -ItemType Directory -Path c:\Scripts
$bootfix | set-content c:\Scripts\bootfix.ps1

# Create a scheduled task on startup to execute script if required (if E: is lost)
$action = New-ScheduledTaskAction -Execute 'Powershell.exe' -Argument 'c:\scripts\bootfix.ps1'
$trigger =  New-ScheduledTaskTrigger -AtStartup
Register-ScheduledTask -Action $action -Trigger $trigger -TaskName "Rebuild TempDBPool" -Description "Rebuild TempDBPool if required" -RunLevel Highest -User System
</powershell>
- Click “Next: Add Storage” : And add 4 EBS 500GB (2TB) GP2 for the data files. (Do not remove the instance store)
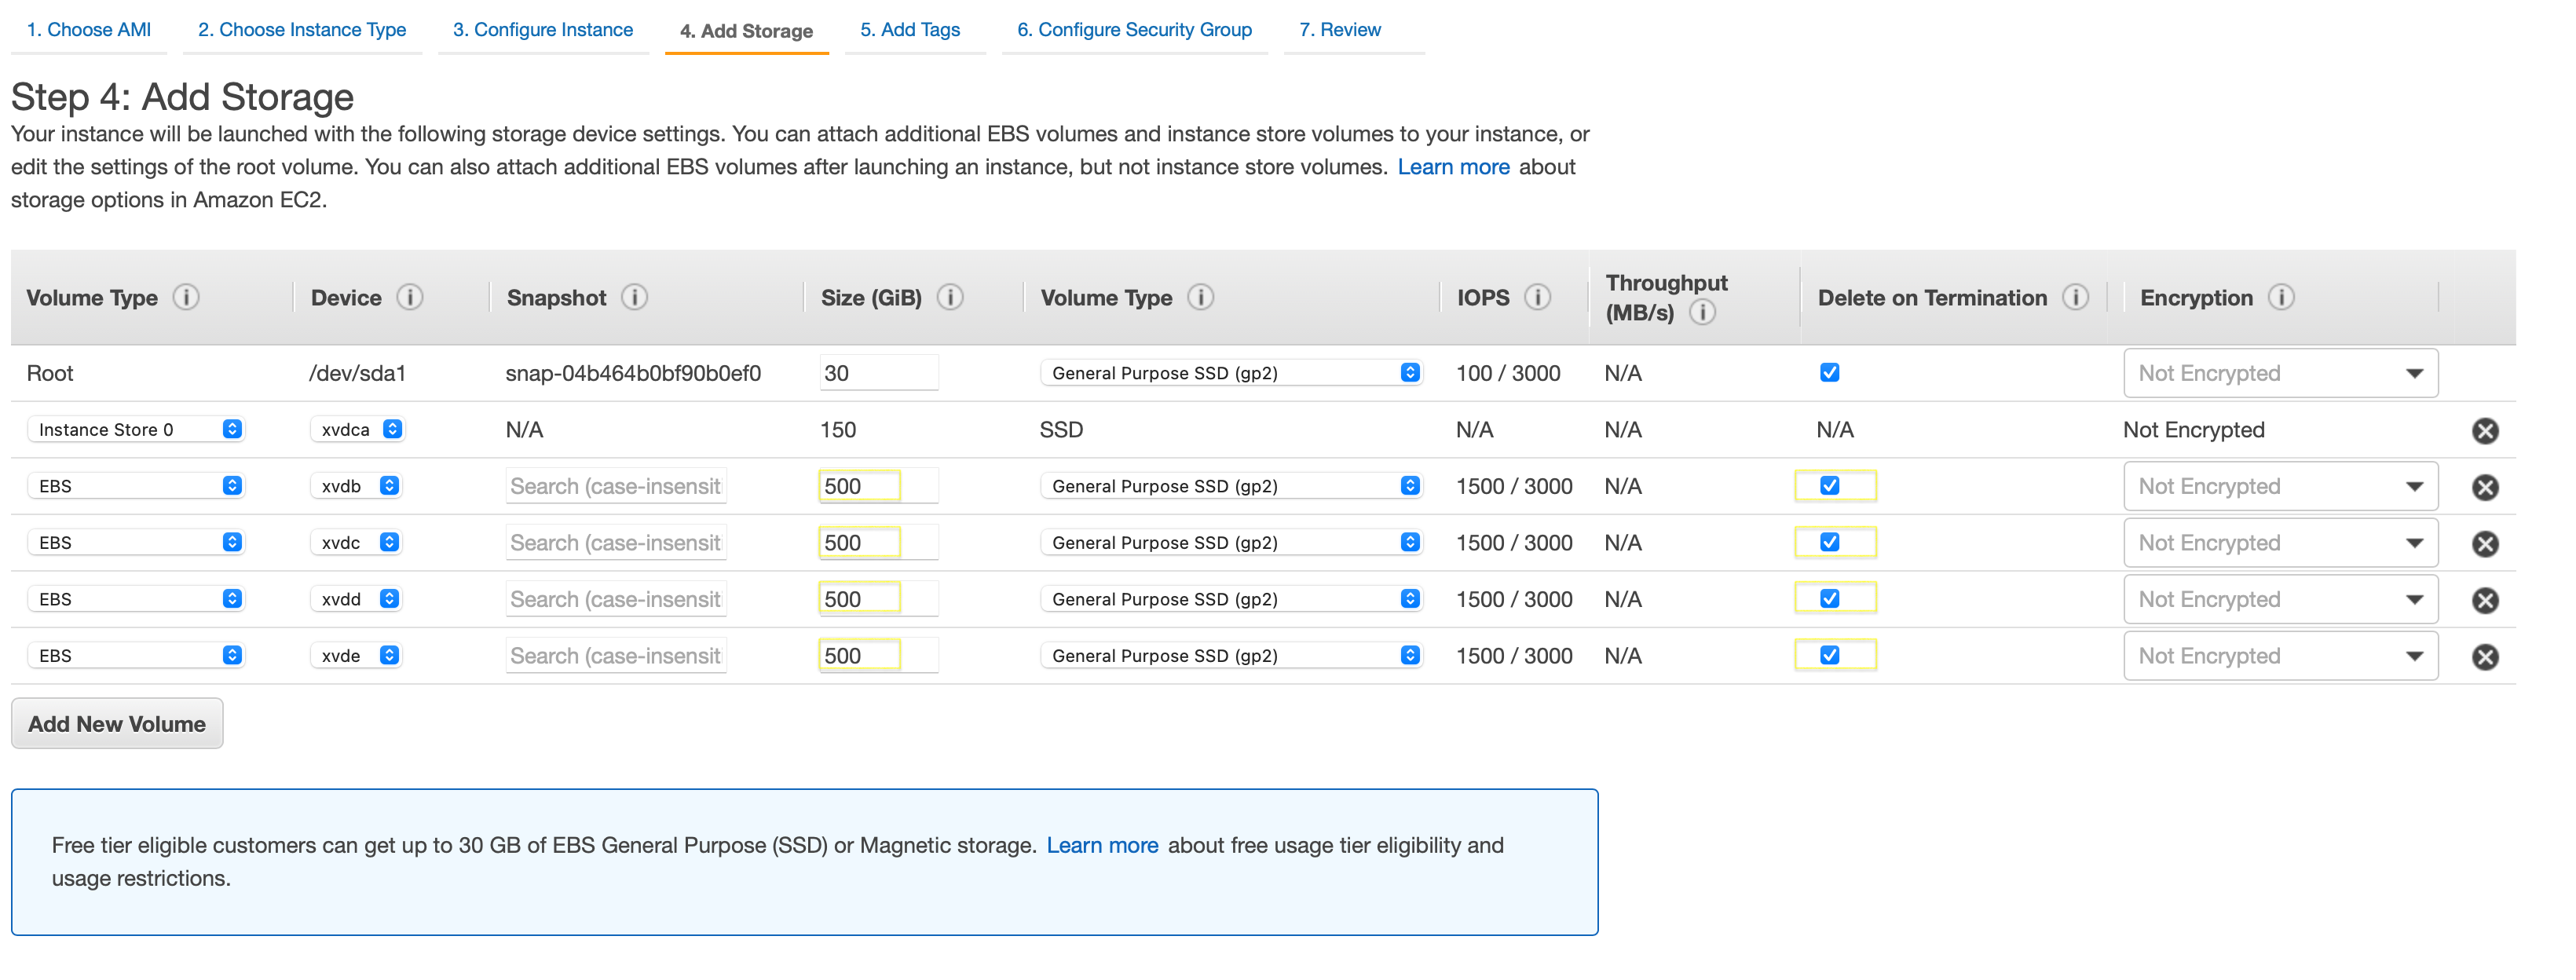
-
Click “Next Add Tags”: Add “Name”: SQL-Node1
-
Click “Next Configure Security Groups”
-
Select module-mysql-workshop-vpcStack-1N9ODMBJ5M930-SecurityGroup-1WJCZ85L3NS0U (or similar name as long as the words SecurityGroup is in it)
-
Click “Review and Launch”
-
Click “Launch”
-
You will be prompted to select a key pair for authentication. Create new one! and download it and click “Launch Instances”
-
Go back to EC2 console and click on Launch more like this:
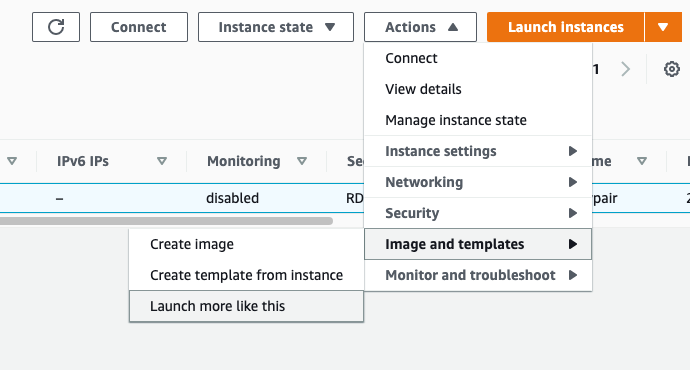
-
Launch the second instance with the same setting, place it on Site2 with the IP 10.0.2.x
-
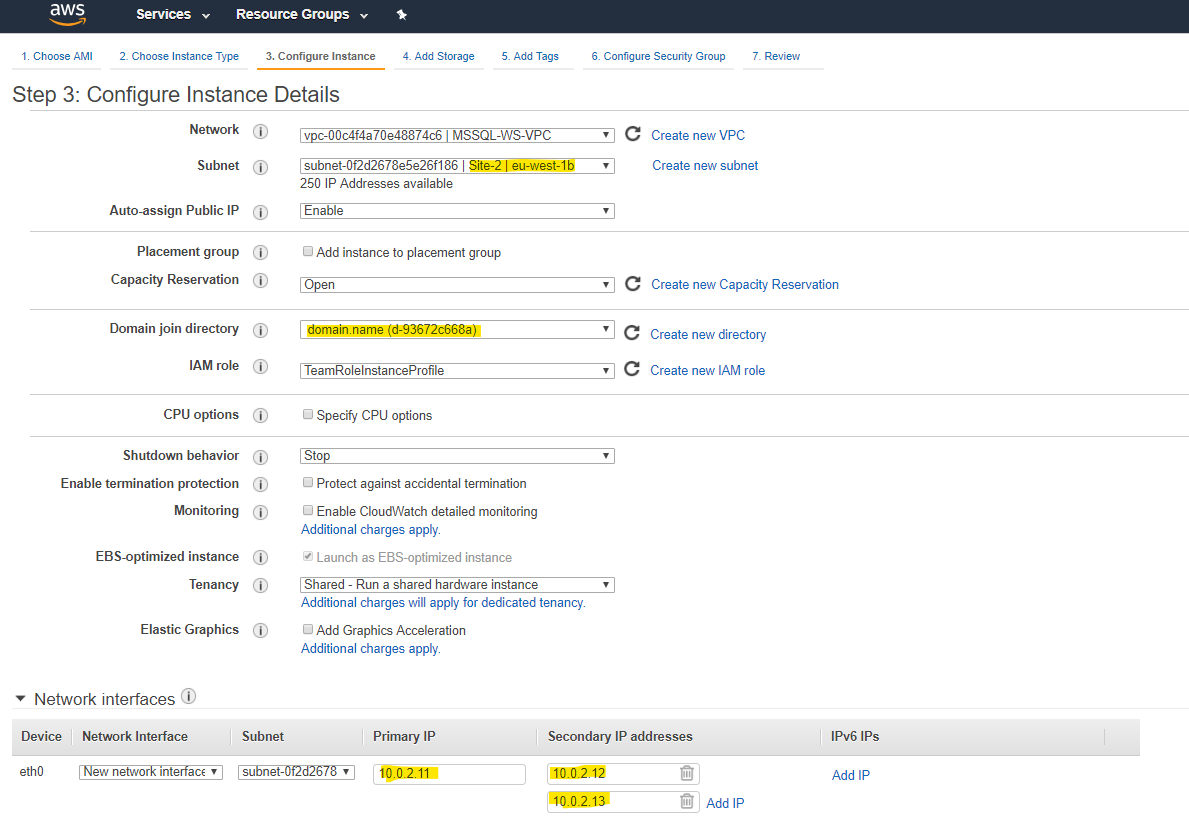
In the launch wizard change only the following:
- Domain Join: manually select the domain
- Network Interface: Change the IPs to the second subnet
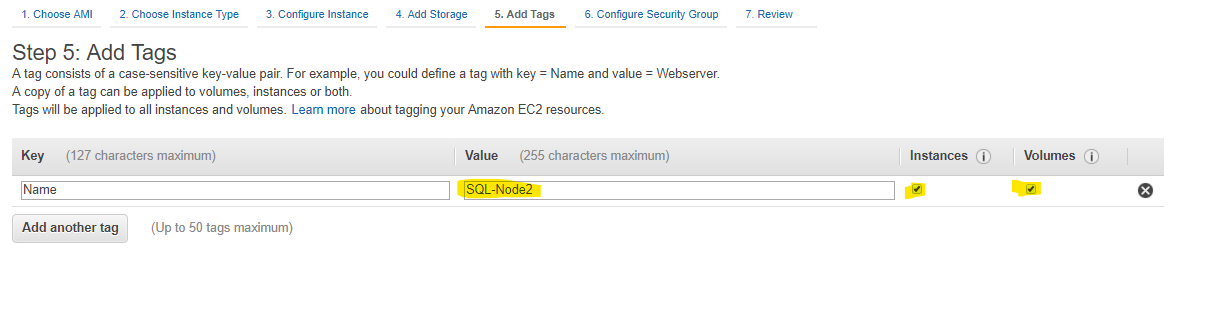
- Add Tags tab: change to Node2
-
Click “Next: Add Storage” : And add 4 EBS 500GB (2TB) GP2 for the data files
- Click “Next: Add Tags” : And change the tag name
Click “Review and Launch”
Wait for the “Status Checks” to show “2/2 checks passed” and your instance will be ready to connect.
If you are using the account from EventEngine, go to security group wizard, and edit the 1.1.1.1 to your local ip 
Congratulations!
You have launched two new Windows Server 2019 EC2 instances with a pre-installed SQL Server 2017 Standard Edition